Back Lever Physics
Ever heard of a back lever? No, it's not that rusty physics apparatus gathering dust in the back of your local physics lab. It's a bodyweight strength maneuver requiring you to hold onto a bar (or gymnastics rings, or a tree branch, etc.) and extend the body until it's fully parallel to the ground face-down.
The move requires significant strength and tension throughout the whole body.

A one-leg back lever — one of the final progressions typically accomplished before performing the more difficult full back lever.
Back levers borrow their name from the simple machines (levers) that capitalize on torque to make it easier to lift heavy objects. In the case of the back lever, however, those seeking strength should take the opposite perspective: How can I increase the torque on my shoulder in this position to increase difficulty?
Mastering this move can be made much easier through a progression of variations that slowly increase the torque experienced at the shoulder. There's strength in physics!
Bodyweight Fitness
When you think of bodyweight fitness, your mind may drift back to some gym class staples: sit-ups, push-ups, and pull-ups. But bodyweight fitness extends far beyond these basic moves, and the back lever is but one example of more advanced bodyweight skills.
Weightlifting provides a straightforward approach to gaining strength: slowly add weight to your workouts to move forward. Bodyweight fitness, on the other hand, requires a little more creativity because you can't easily add to your bodyweight like you add extra pounds to your dumbbell routine.
Instead, decreased leverage accomplishes the same goal as adding weight at the gym. Today we'll look at the back lever as an example, examining five progressively harder variations of the move:
The Tuck Back Lever
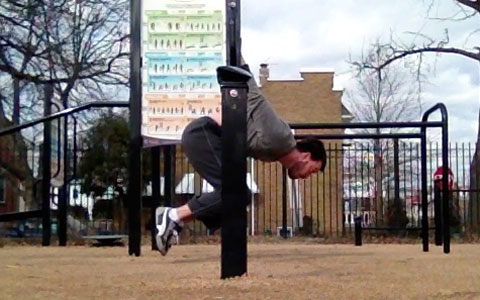
The Advanced Tuck Back Lever
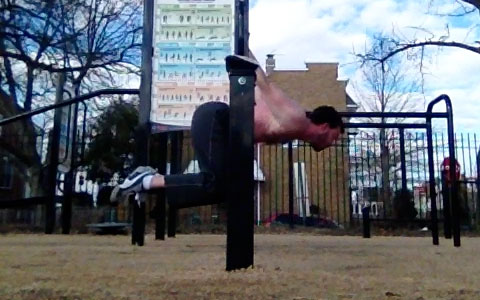
The One-Leg Back Lever
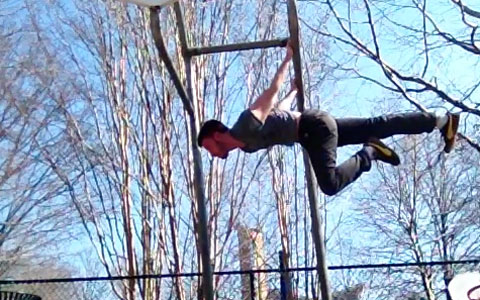
The Half Lay Back Lever
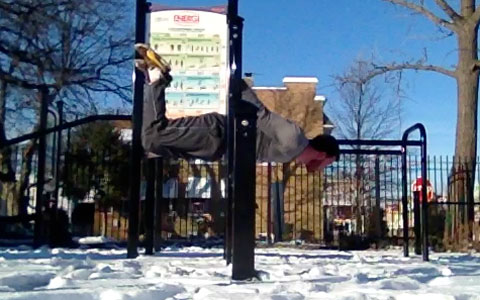
The Full Back Lever
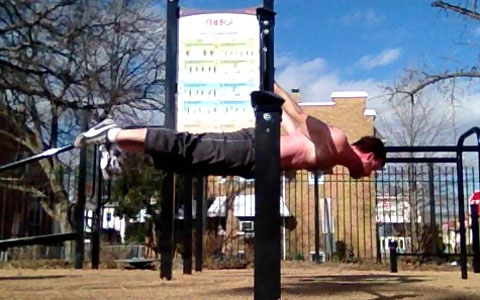
The Importance of Form
While torque can explain much of the back lever's difficulty from a physics perspective, form also plays a significant role in determining a progression's difficulty. For example, maintaining a supinated grip ("chin-up" grip) adds pressure on the biceps and tendons in the elbows. Also, the harder progressions require more tension throughout the body, something that torque at the shoulder doesn't fully explain.
Keep in mind that our bodies are certainly more complex than simple levers. Because of the many muscles engaged during the back lever, there's more to the skill's difficulty than this physics explanation. Nonetheless, this "spherical cow" approximation can explain much of the relative differences in difficulty among the five progressions listed above.
If you choose to work on your own back lever, here's a few tips to follow throughout all of the progressions:
1. Keep a flat/straight back (after the tuck version). Looking forward helps you maintain this position.
2. Keep your body tense. The full back lever will require tension throughout the whole body, all the way down to your toes (keep them pointed!).
3. Keep your shoulders slightly protracted. This means keep your shoulders slightly forward (toward your chest).
4. Maintain straight arms.
5. Start on the easiest progressions! If you've never done this before, first attempt German Hangs. Performing a back lever, especially with the more difficult chin-up grip, can place great stress on your elbows, biceps, forearms, and core muscles. Your body needs time to build not only muscle strength but also connective tissue strength.
Increasing Torque
Despite the progressing difficulty of these moves, you're resisting the exact same amount of force for each one: your bodyweight. From a simplified physics perspective, the difficulty stems primarily from increased torque. So how can we increase the torque experienced at the shoulder?
Torque=F*d*sin(theta)
F=Force, which will be your bodyweight minus your arm weight for every move; this doesn't change. To maintain the static position, you'll have to exert a positive upward force at your shoulders equal and opposite to the downward force of gravity centered at your center of mass — the mean position of every tiny particle in our body.
D=Distance, which is the distance between your shoulder and your center of mass. For a typical person, center of mass (COM) lies just below the belly button when lying down. As you'll see, we can change this variable to increase torque.
Theta=the angle between the distance, D, vector and the upward force experienced at your shoulder. Sin(90 degrees) equals 1, the maximum value for this variable. Unsurprisingly, this occurs when the body fully extends in the full back lever.
Conversely, when performing a dead hang from the bar, the upward force vector and the the vector for the Distance, D, form a 180 degree angle, leading to a 0 value for the sine variable. In this case, there's no torque on the shoulder, making it much easier. As with the distance, we'll be able to change this variable throughout the progressions.
So to increase torque we can lengthen the distance between the center of mass and the shoulder. Also, we can change the angle between the upward force at our shoulder and the line between the center of mass and the shoulder.
Let's begin.The Tuck Back Lever
For this progression, grab the bar and kick your legs forward and up over your head until your legs hang above you. Slide your legs under the bar and slowly lower down in the fetal-like position seen in the picture until your hips are in line with your shoulders, forming a parallel line with the ground. For this variation, don't worry about keeping your back straight; that'll come later.
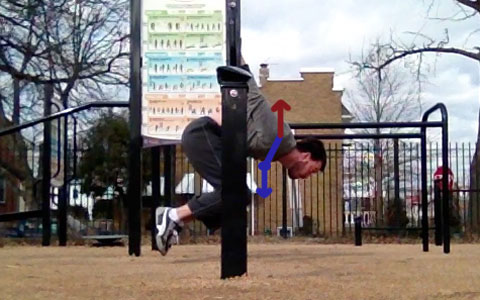
The blue dot represents my center of mass (approximately; it might be slightly too far forward in this picture). The downward blue arrow represents the force due to gravity. The red arrow represents the equal and opposite upward force exerted at the shoulders. These symbols and colors will stay consistent throughout the article.
Center of Mass (COM): Your arched back and forward knees will pull your COM closer to the shoulders and downward toward the ground. As you can see in the picture below, I've estimated that the center of mass will lie close to the shoulders and below the torso.
Notice that theta is slightly closer to 180 degrees than 90 degrees (right around 150 degrees). As I progress, this angle will converge on 90 degrees, increasing the torque at the shoulder.
Advanced Tuck Back Lever
The advanced tuck back lever requires you to pull your knees back and flatten your back. The back should be parallel to the ground, and 90 degree angles should form at the hip and the knee.
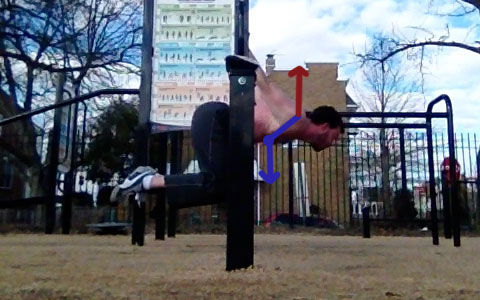
Effect on COM: By pulling the legs back, I've also pulled back my COM toward my toes; also, the straightened back will bring my COM upward slightly.
Effect on D, Distance: The change in COM has slightly increased the distance from my COM to my shoulder.
Effect on sin(Theta): Theta has shrunk closer to 90 degrees, slightly increasing this variable as well.
Effect on Torque: A larger distance and an angle closer to 90 degrees increase the torque slightly.
One-Leg Back Lever
For the one-legged back lever, simply extend one leg fully while resting the other foot under the knee of the extended leg. As always, maintain a straight back, look forward, and maintain body tension.
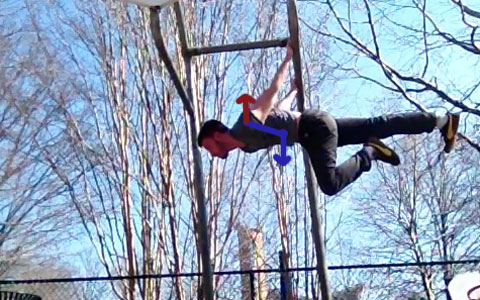
Effect on COM: By extending one leg, I've further extended my COM backward. Additionally, lifting this one leg to a level plane with the back will slightly raise my COM upward toward my torso.
Effect on D, Distance: The change in COM has slightly lengthened the distance between my COM and my shoulder.
Effect on sin(Theta): Theta has converged even closer to 90 degrees, significantly increasing the sine variable.
Effect on Torque: A larger distance and an angle closer to 90 degrees increase the torque moderately. The difficulty between the advanced tuck and the one-leg progressions exceeds the difference between the tuck and the advanced tuck.
Half Lay Back Lever
You're almost there! For the half lay back lever, keep your body straight down to your knees and point your lower legs upward. This will create a 90 degree angle at the knee.
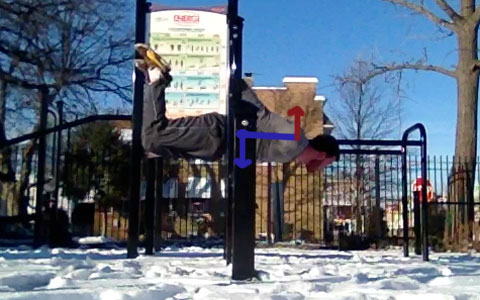
Effect on COM: Raising both legs backward brings my COM back even further. Curiously, the lower legs sit above the rest of the body, pulling the COM upward, slightly past the point of 90 degrees.
Effect on D, Distance: The change in COM has slightly lengthened the distance between the COM and my shoulder.
Effect on sin(Theta): Theta has passed 90 degrees and gone back in the other direction ever so slightly. Although the angle is now smaller than 90 degrees, it's still closer than in the one-leg variation.
Effect on Torque: A larger distance and an angle closer to 90 degrees increase the torque slightly.
Full Back Lever
This is the final progression. Your shoulders, hips, and toes should form a straight line parallel to the ground. Remember to keep those shoulders slightly protracted and tense throughout the body (point toes on both feet, unlike me!).
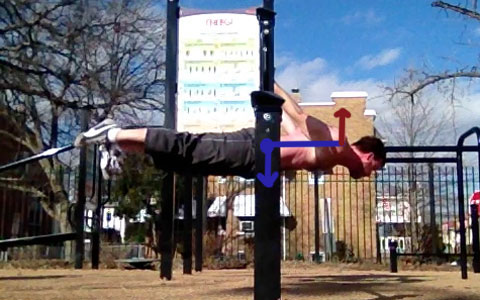
Effect on COM: With full extension, my COM should sit just below my belly button, just like when I lie down.
Effect on D, Distance: The change in my COM will moderately increase the distance between my COM and my shoulder.
Effect on sin(Theta): Theta should be right at 90 degrees, maximizing this variable.
Effect on Torque: A larger distance and a 90 degree angle increase the torque moderately from the half-lay progression. Due to the larger distance and 90 degree angle, this move creates the most torque at my shoulder.
So there you have it: the physics behind the back lever. You'll find that you can do similar analyses for several other bodyweight skills. Check out this discussion on reddit to understand the similar physics behind the much more difficult planche maneuver. For more info on bodyweight training in general, check out the related subreddit.
Also, there's definitely more than one way to skin a cat. See the video below for one of the best walkthroughs I've seen for the back lever.
-Brian Jacobsmeyer


